If you have any questions, you can contact us directly by email: [email protected]
The manual is available in different formats, you are currently reading the web version. On the right you'll find a download button where you can get a PDF or eBook version so you can add it to your iPhone Books app and read it on the go with MapOut.
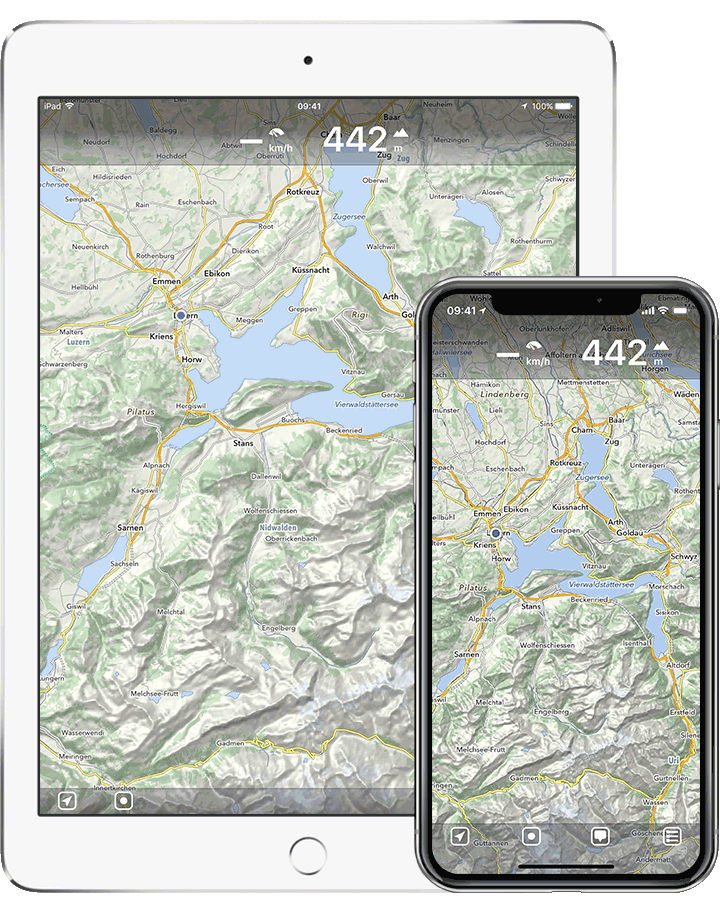
MapOut is an offline map for your iPhone or iPad with many unique features. It is the right choice for any outdoor activity and allows you to plan, record and follow your tracks on any terrain.
Offline map covering the whole world –
for hiking, biking or as city map.
Offline means: Once you have downloaded your map data, all features like searching and exploring the map are fully functional without the need for an internet connection. Often when you are abroad or off-track in nature, there is no reliable cell coverage. So you need an offline map — you need MapOut.
You can download MapOut at: MapOut.app
This manual for MapOut is structured similar to the app itself and consists of the three main parts: Map, Tour Organizer and Settings. Each sub-section usually starts with the more fundamental topics first and towards the end of each section, the more advanced or expert things are discussed.
You can either read this manual from start to finish or just look-up parts you are interested in. All sections are self-describing but it might help if you read the “Overview” sections first to get a glimpse of the basic features.
Often images are annotated with touch indicators — to make it more clear where to tap and what kind of tap is required for certain actions (e.g. normal tap, long-tap, double-tap, …). The following tap-conventions are used throughout the manual:

Sometimes the taps would cover important aspects of the image, so some parts of the image are placed above the tap illustration or the tap illustration is slightly moved for better understanding.
Functions are often nested inside a menu structure — so a text stating 
![]() Search means: Tap on the icon on the screen and then on the Search button.
Search means: Tap on the icon on the screen and then on the Search button.
The map view is the main screen of MapOut and from there you have access to all features of the app.
The map is grouped in three different areas:

 (Whether the scale always remains visible or is automatically hidden after a while, can be changed in the settings).
 Location: Pinpoints your current location on the map.
 Record: Allows you to record your own tours and quickly add new waypoints. Menu: Here all map related features are included.
 Tour Organizer: Manage your recorded, drawn or imported tours here.
When you first start your app, the dashboard shows the current speed and altitude. You can toggle the speed/pace indicator from km/h or miles/h to min/km or min/mile by tapping on it — especially for slow moving activities like hiking the min/km or min/mile pace indicator is more useful. If you tap on a tour on the map the dashboard will show an elevation/altitude profile. During recording the dashboard shows the elapsed time and distance as well.

To hide and show the dashboard you can either tap on the status bar or select ![]() Hide Dashboard respectively
Hide Dashboard respectively ![]() Show Dashboard.
Show Dashboard.
When in other parts of the app (e.g. in search, tour drawing mode) the dashboard shows different information relevant for the specific mode.
The following basic map interactions are supported:

To get a feeling for the terrain you can tap with two fingers on the map (> 2 seconds) and an interactive elevation/altitude profile is shown. You can then slide your fingers over the map to get a quick estimate on the distances or altitude differences. To fine-tune your profile you can also move the black start/end dots with one finger.

If you have drawn or imported your own tours, they are shown in a red color on the map. You can tap on one to get information about it. If too many tours are overlaying a pop-up will show-up and you can then select the tour you want.
If you zoom into an unknown map area the map is gray and download buttons  are displayed. You can tap on the missing map area to quickly download detailed maps for your region. For more information, please see Download Map Data below.
When you first open MapOut, an Apple alert is shown to ask you for permission to its location services. Permission is needed to display your current location on the map and if you later record your own tours. We only need access to location services while you are using the app and don’t have access otherwise.
The location on the map is displayed as a blue dot and there might be a circular blue area around it, which indicates the current position accuracy. A small or no blue area indicates a very precise GPS location, while a large one will indicate very rough location accuracy. If your device can determine the magnetic earth field, a heading indicator is shown.

The location button is the first button in the toolbar. It has four modes, which you can toggle by tapping on it:
Normal: The button is white and does not have any color otherwise. Your current location is indicated by a blue dot on the map. It does have a heading indicator and points to the direction your iPhone is facing. Tracking: The button is blue now and the map is moved and zoomed to your current location. The map is automatically re-centered as you move.
 /
/  Tracking and Heading: Similar to Tracking, but the map is now also rotated to display the map ahead of you. There are two heading modes available, both can be adjusted in
  Off: To save battery you can disable the location service by tapping > 2 seconds on the location button - the GPS hardware is then turned off.
The second button on the toolbar is the record menu where you can either record your own tour or quickly add waypoints (points on the map you want to remember, e.g. a nice lookout point).
To record a tour, tap on ![]() Record. The dashboard will now change to recording mode and displays additional information about your elapsed time and traveled distance.
Record. The dashboard will now change to recording mode and displays additional information about your elapsed time and traveled distance.

Starting a recording requires a precise initial GPS location2 and an alert is shown if the current GPS location is not precise enough. You also see a spinning circle  in the distance indicator on the dashboard and a red location dot on the map. MapOut is now waiting to start the location recording until a better GPS reception is found and automatically starts recording then. During recording the GPS reception is always measured, so no imprecise location is added to your tour recording. If the required precision drops below our acceptable value, the location dot changes to red. If the precision is acceptable again it will change to blue. So blue is good, red is bad.
While recording you can always pause or stop your recording by pressing ![]() Pause or
Pause or ![]() Stop. If you tap
Stop. If you tap ![]() Stop, the tour will be saved in our tour organizer. Additionally, we try to add the passed cities and villages as a breadcrumb to your recorded tour details (e.g. Zurich - Zug - Luzern) to help you more easily find them again.
Stop, the tour will be saved in our tour organizer. Additionally, we try to add the passed cities and villages as a breadcrumb to your recorded tour details (e.g. Zurich - Zug - Luzern) to help you more easily find them again.
If you switch to another app during recording, you see a blue status bar on the top of the phone. This indicator is automatically added by Apple to give a hint, that MapOut is still using your location.

To quickly add waypoints, tap ![]() Waypoint - this can be done during tour recording or also during normal operation. A waypoint is now placed in the middle of the map and you can either move your waypoint with the finger (you can also zoom in or out on your map to more precisely adjust the waypoint position) or enter the coordinates directly. Currently, you can enter coordinates in three different formats:
Waypoint - this can be done during tour recording or also during normal operation. A waypoint is now placed in the middle of the map and you can either move your waypoint with the finger (you can also zoom in or out on your map to more precisely adjust the waypoint position) or enter the coordinates directly. Currently, you can enter coordinates in three different formats:
To indicate the direction, you can either use +/- signs or N, E, S, W. For example -47° 12’, 47° 12’ S or S 47° 12’, we try to understand almost any format variation. You can also set a name and detail for your waypoint. To quickly delete a text field you can use the small  button on the right. Tap on Save to store the waypoint or Cancel on the left to dismiss the waypoint.
To change the color or symbol of a waypoint, tap the  icon to the right side of the detail field.
The name of the waypoint is directly taken from the underlying map data. E.g. if you place a waypoint at the location of a restaurant, we take the name of the restaurant as the name. Of course you can change the name to anything you like.
When you first open MapOut only a world overview map is included. If you zoom in the map becomes gray and download icons appear. You can download detailed maps for your region by tapping on it. Alternatively, you can also go to ![]() Download Map Data.
Download Map Data.

Our detailed maps are tile based and you can select any map regions you like in the map download view. While you select your regions an indicator is shown in the dashboard, how much data is going to be needed to download. To start a download, tap on Download. To delete a previously downloaded region, tap on the already downloaded tiles (indicated by a brightened color) and tap Delete, the selected tiles are then deleted.

Selecting a large area (e.g. whole of Europe) could be tedious, so you can also zoom out and you will see the selectable tiles become larger. This way you can download large areas quickly.
During download the “ ![]() Download Map Data” button changes to a download indicator. If you tap on it, it allows you to pause, delete or resume the download.
Download Map Data” button changes to a download indicator. If you tap on it, it allows you to pause, delete or resume the download.
We update our map data on a weekly basis and to update the maps on your device you can re-select the required map regions as described above. If you quickly want to update all map data on the device, there is an update mechanism in ![]() Settings
Settings ![]() Map Data
Map Data ![]() Update All Map Data. To quickly reclaim storage space, you will also find a button there to delete all map data:
Update All Map Data. To quickly reclaim storage space, you will also find a button there to delete all map data: ![]() Settings
Settings ![]() Map Data
Map Data ![]() Delete All Map Data.
Delete All Map Data.

MapOut allows you to search for places, streets, … on all your downloaded map data. Go to ![]() Search and type in your search terms, then hit Search on the right or on the keyboard.
Search and type in your search terms, then hit Search on the right or on the keyboard.

The search results are highlighted on the map and also shown in a list. The list also indicates the type of result (e.g. city, peak name) and where it is located. You can tap on the list results and see the result on the map or select a search result on the map and see the corresponding result on the list. Tap Done in the top-right corner to exit search mode or alter your search term and search again.
Select ![]() Show Tilt Perspective to get a new fresh look of your map. Now you can tilt your device in any direction to get a 3D feeling of the terrain. Please note: It will not work upside-down (e.g. it will not work when you lay on your bed and hold your phone upside down).
Show Tilt Perspective to get a new fresh look of your map. Now you can tilt your device in any direction to get a 3D feeling of the terrain. Please note: It will not work upside-down (e.g. it will not work when you lay on your bed and hold your phone upside down).

Besides recording tours you can manually plan and draw your own tour by tapping on ![]() Draw New Tour. When you select an existing tour (e.g. an imported or recorded tour) the menu entry is called
Draw New Tour. When you select an existing tour (e.g. an imported or recorded tour) the menu entry is called ![]() Redraw Selected Tour.
Redraw Selected Tour.
The drawing editor shows a dashboard on the top. Initially, it displays a short help. During drawing, it shows additional tour information like an altitude profile or coordinates for waypoints.

On the bottom you have another toolbar with four buttons:
 Undo: Reverts a change.
 Redo: Redoes a change. Menu: A menu button with additional actions.
As indicated in the short help on the dashboard, you can add new waypoints or tours:
 on the map.
Please note: When editing or touching up an existing tour, we remove all timestamp information from that tour. If you have recorded your own tour and rely on the time stamps (e.g. for photo tagging purposes), save the tour as a new tour and do not overwrite the existing tour.
Double tap on the map to set your start point. An marker is placed on the map. Either tap on a follow-up location on the map to add a stretch or move the handle to manually draw lines. You now see a  marker as well. To continue drawing: Drag the handle over the streets or tap on a new location to add a new stretch. After you have both and markers on the map, you can also make adjustments on the marker by dragging it on the map. MapOut tries to automatically snap your tour on the road network whenever possible. If no roads are on the map and snapping is not possible, a dashed line is shown.
The routing is influenced by  Route Options and the current active
  Overlays:
You can change the route settings also during drawing, e.g. set the profile to hiking for the first part and then change to freeform to make a truly off-track part through the woods.

To redraw parts of your tour, grab a location on the tour and drag it over the streets you want. Please make sure to close the loop back to the tour - only then your changes are accepted.

To add another (non-connecting) segment to the tour, double tap on another location on the map and a new segment can be drawn. You can switch between all your segments by tapping on it. The currently selected segment displays the , markers and distance labels.

There is a short help if you tap the small  button on the dashboard or select
 ![]() Help.
Help.
There are a few actions in the Menu:
 Delete Tour / Tour Segment: Will delete the selected tour or tour segment.
 Snap to Road Network: This will try to snap the tour to the underlying road network. This is especially useful if you imported a tour from the internet or recorded a tour by yourself. Often those tours are a bit “rough” and are not aligned to the roads because of limited accuracy of the GPS receiver (GPS has a best case accuracy of approx. 10 m / 30 ft).
 Reverse Tour / Tour Segment: Reverse the direction of the tour or tour segment, so and are swapped.
 Rename Tour: Allows you to specify a name and detail information about your tour.
 Select Color: Choose a color for your tour. As default we use a red color. Route Options: Will set the options used for routing:
 Profile: Sets the preferred profile: Walking is great for hiking, Cycling sets priority on bike tracks, Shortest will try to find the shortest distance and Freeform will disable all street snapping and allows you to draw an arbitrary track.
 Roads: Sets the desired street width: Small will prefere small roads, Medium will route on small and medium roads and Large will route on any roads.
 Ascent: Sets the desired altitude difference: Little tries to avoid any ascent, Average will try to avoid heavy ascent and Steep does not take altitude changes into account. Overlays: All active/visible overlays are also taken into account when routing: E.g. if you have the hiking overlay visible, MapOut will give higher priority to these routes and will lead along them if possible.
A long tap on the map will add a new waypoint. You can freely move your waypoint on the map to precisely place it. If you need more accuracy you can also directly enter your latitude/longitude information by tapping on ![]() Edit Waypoint and overwrite the coordinates.
Edit Waypoint and overwrite the coordinates.

To add another waypoint, long tap on another location on the map. You can switch between all your waypoints by tapping on it. The currently selected waypoint is highlighted with a black overlay behind its name.
There are a few actions in the Menu:
Delete Waypoint: Will delete the selected waypoint. Edit Waypoint: Allows you to manually enter its coordinate, name and detail information. Select Color & Symbol: Choose a color and icon for your waypoint. As default we use a red star. Route Options: Will set the options used for routing — route options have no effect when placing waypoints, see Adding & Editing Tours. Overlays: Will show/hide overlays on the map — other than that, overlays have no effect when placing waypoints, see Adding & Editing Tours.Usually, all available tours are displayed as red lines on the map. If you have many tours in the same region, it can become confusing where each tour starts or ends. Or you want to look on a clean map and do not want to display any tours for the moment.

For this, we have several tour display toggles in the Menu:
, you can temporarily hide all other tours on the map. Now only the selected tour is shown (e.g. useful if you want to hike the selected tour. You don’t need to see all other tours in this area). To display all tours again, tap You can also manually hide special tours in the tour organizer by changing its visibility (e.g. if you want to “archive” certain tours and do not longer want to display them) - see Tour Organizer ![]() Visibility
Visibility
MapOut provides a few map overlays you can enable in ![]() Overlays.
Overlays.

Here you can quickly activate or deactivate multiple overlays. All activated overlays have a  mark to the right. To quickly remove or enable all overlays, tap on the element at the top: Hide All Overlays or Show All Overlays.
While displaying overlays on your map, you can tap on any of them to display additional information (e.g. name) on the dashboard along with their altitude profile.
Displays a tourism overlay, which more prominently displays hotels, restaurants, and points of interests.
Displays train, tram, and bus networks and stops on a bluish color.
Displays bicycle routes and trails on the map in greenish color.
Displays mountain bike routes on the map in greenish color. When available also the track scale is indicated e.g. “MTB 2”. The scale is taken from OpenStreetMap.
| Scale | Description |
|---|---|
| 0 | Easy. No special skills are needed to ride this. |
| 1 | Some obstacles on the road (e.g. roots or small stones). Soil can be loose in some places. Riding requires care and attention, but no special skills. |
| 2 | More obstacles like larger rocks. The soil is often loose. Can contain steps. Requires some advanced riding skills. |
| 3 | Large obstacles like boulders or large roots. Road can be very slippery. Constant concentration and very good skills needed. |
| 4 | Very steep and difficult. Frequent loose debris. Some trials techniques will be necessary. |
| 5 | Very steep and difficult with big boulder fields and debris. Very few can actually ride at this level. |
| 6 | Dangerous to impossible to ride. Only for the very best. |
Displays hiking routes on the map in purple color. When available also the track SAC scale (Swiss Alpine Club track classification) is shown, e.g. “T2”. The scale is taken from OpenStreetMap.
| Scale | Description |
|---|---|
| T1 | Hiking - area flat or slightly sloped, no fall hazard. |
| T2 | Mountain hiking - terrain partially steep, fall hazard possible. |
| T3 | Demanding mountain hiking - partly exposed sites with fall hazard, scree, pathless jagged rocks. |
| T4 | Alpine hiking - terrain quite exposed, precarious grassy acclivities, jagged rocks, facile snow-free glaciers. |
| T5 | Demanding alpine hiking - exposed, demanding terrain, jagged rocks, few dangerous glaciers. |
| T6 | Difficult alpine hiking - often very exposed, precarious jagged rocks, glaciers with danger to slip and fall. |
Displays ski pistes, nordic and sled tracks. Ski pistes are color coded according to their difficulty (green, blue, red, black) and a direction arrow indicates the downhill orientation. Nordic tracks are displayed in a dark purple color, while sled tracks have a yellowish color.
MapOut uses map data from OpenStreetMap.org. OpenStreetMap is similar to Wikipedia — but for map data: Anybody is invited to map an area, add streets and buildings or correct mistakes. If you want to improve the map or found some mistakes, you can directly edit the map on OpenStreetMap.org with your computer. The easiest way to start editing is selecting Edit on the top-left corner — right next to the OpenStreetMap logo. There are several editors available, but we like the iD in-browser editor best — it offers many features and is easier to use than the others.
If you click on Edit with iD and do not have an OpenStreetMap account, you are asked to register one first. After the registration process, you are good to go. Correcting mistakes are the easiest type of changes: You can correct spelling errors on streets or correct street layouts. Adding points of interests (e.g. restaurants, viewpoints) is also a relatively easy task and the iD editor helps you to add the relevant information required for each type (e.g. a restaurant usually has a name, a cuisine-type, …).
We fetch the newest data on a weekly basis — so any addition you do on OpenStreetMap.org will be added into MapOut within a couple of days.
The tour organizer is the place where all your tours3 are stored and organized. On the iPhone, the tour organizer is shown in a separate screen, while on an iPad it is displayed side-by-side on the right part of the screen.

The organizer is grouped in three different areas:

 ” on the left to go back to the map (on the iPad there is a “
 ” instead to quickly close it). On the right, there is an action button which can change its function depending on the current context (it can be a menu button
  , an edit button or a login button). In the middle, there is a scrolling indicator, if the information view has additional screens.
Whenever you tap on a tour in the list below, an overview map is shown here. You can swipe this view to get an altitude view or tour metadata.
When you select a tour, an overview map is displayed and some statistical information is shown:
 Distance: The overall length of the tour.
 Ascent: The uphill difference in altitude.
 Descent: The downhill difference in altitude.
 Waypoints: The number of waypoints (“pts” meaning points) the tour consists of. A very detailed tour usually contains a lot of points, so all bends are nicely displayed. Some tours (often imported ones) are sometimes rough and only consist of few waypoints and you can improve it by using the Snap to Road Network as described in section Adding & Editing Tours.
On the bottom left there is a zoom button  to display this tour on the main map view. If you don’t have downloaded the map area for this tour yet, a download button
  is displayed on the bottom right.
By default, tour overviews are displayed in red on a black & white map. You can change it to a colored map in ![]() Settings
Settings ![]() Tour Organizer
Tour Organizer ![]() Tour Preview.
Tour Preview.
When no tour is selected a quick help is shown on how you can import tours or how you can login/register a MapOut.me account.
When you have imported, drawn or recorded some tours, they are listed here. You can see a thumbnail, title, creation date and some details for your tour. Whenever a tour contains multiple parts (tracks, waypoints) an  is displayed on the right side. Tap on it and you can see all the tracks and waypoints this tour consists of.

To perform an action on a tour (e.g. share, edit or delete) tap > 2 seconds on it or select the Menu icon on the top-right of the screen. Both methods will then display a pop-up menu with all available actions.
You can set the ordering of the tours in ![]() Settings
Settings ![]() Tour Organizer
Tour Organizer ![]() Sorting.
Sorting.
You can also organize the list hierarchically by adding folders or even subfolders. Folders are always shown on the bottom of the list. Creating folders is done inside the Move action — see Move below.
Beside directly drawing or recording your own tours, you can find tours on the internet — usually GPX files. There are two ways to get them into MapOut. Either you register a free MapOut.me account and use its import service — or you can directly open GPX files with MapOut.
The easiest way to import tours is by registering a MapOut.me account. What you get is your own “username@mapout.me” email address. You can then send emails with attachments4 to this address and all included tours are automatically imported to your tour list.
When you first open your empty tour list, a help screen is displayed and you see a Login button on the top-right of the screen. You can now either register or login to your account. The username you choose becomes your account name, (e.g. using a username of happy you get happy@mapout.me as your MapOut.me account email address).
We don’t share your email address with anybody outside of our company and will not spam you. The email address is only used if you forgot your account password and request a password reset or other account related matters.
There is no requirement to apply for an account — all other functions of MapOut work equally well with or without an account.
You can also send ZIP files (compressed files) to your mapout.me address. If you structure your files in a ZIP with folders and subfolders, they get imported in the same hierarchical structure. This can come handy if you want to import a lot of tours.
If you want to import a tour into a special folder in MapOut, you can start the email subject with a dash “/” followed by your folder (and subfolder) names. E.g. if you mail a tour to your mapout.me address and set the subject line to “/Holiday Tours/Day 1” they get directly imported into the folder “Holiday Tours” and its subfolder “Day 1”. If the folders do not exist yet, they will be automatically created while importing.
There is also the possibility to directly import tours by using the standard Apple mechanism to open files with apps. At the moment only GPX files are supported for direct import. Usually, you select “Open in …” in your iOS app and select “Copy to MapOut”. The tour will then be imported.


Tours and waypoints can be shared with others. Tap on a tour for > 2 seconds (or tap on the Menu button on the top-right corner of the screen) and a pop-up will show up. Selecting “Share” will display the standard Apple share dialogue. Depending on the capabilities of your sharing destination we export your tour either as an image (e.g. if you export it to your photo album), as GPX file or both.

There are several methods available and depending on what apps you have installed on your device others might become available. Here is a list of standard share destinations:
Allows you to change the tour or waypoint metadata. You tap on the text you want to change and it will show you a text editor.

The following metadata can be edited:
Allows you to redraw parts of the tour. This will open the drawing editor. See section Drawing Tours for details.
You can hierarchically structure your tours into a folder structure. To move a tour, tour segment or waypoint, tap on it for > 2 seconds (or tap on the Menu button on the top-right corner of the screen) and a pop-up will show up. Select Move and a moving dialogue is shown where you can either choose a destination - or add a new folder (on the very bottom of the list).

If you don’t have an existing folder yet, create one by tapping Add a new folder on the bottom of the list. You will be asked to give it a name and optionally a detail text.
You can move a tour, track or a waypoint into another folder or another tour:
To delete a tour, tour segment or waypoint, tap on it for > 2 seconds (or tap on the Menu button on the top-right corner of the screen) and a pop-up will show up. Select Delete to permanently delete it.

Alternatively, you can also swipe the tour to the left to delete it. In Apple terms, this is called “swipe-to-delete”.
Sometimes you want to walk/bike a tour in the other direction and would also like to see the altitude profile reversed.

To reverse a tour or tour segment, tap on it for > 2 seconds (or tap on the Menu button on the top-right corner of the screen) and a pop-up will show up. Select Reverse to change the direction of the tour.
If you have a lot of tours stored on your device the main map can become crowded - especially if many of your tours cover the same region. You can hide some of your tours and even whole folders. Hidden tours and folder are marked with a crossed eye icon  .
.

If you hide a folder, all containing tours get hidden as well. If you later unhide a specific tour in that hidden folder, the containing folder is displayed with a dashed-crossed eye icon  , meaning: This content of this folder is only partially hidden.
To quickly display the whole tour, tour segment or waypoint on the main map, tap Show on Map and your map gets centered directly on this tour.
If you don’t have downloaded map data for the region covered by this tour yet, this will directly select all needed map regions for a quick download.
There is a general settings screen available where you can set all configurable elements. It is available on the map view when tapping ![]() Settings.
Settings.

You can register a new MapOut.me account or log in to an existing one. An account is not mandatory and is just a convenience to more easily import tours (e.g. GPX tracks) into MapOut. When you register you get your own “username”@mapout.me email address and you can send tracks by email to your MapOut application. See Importing Tours / MapOut.me Account above.
Register a new MapOut account:
Login to your existing MapOut account:
When you are logged in, the My Account page changes, and instead of Register and Login, you see Logout and Change Password. Logout just logs you out of your current MapOut.me account.
Allows you to change your existing MapOut.me password. You have to supply your current password and you can then choose another one.
This section allows you to change the appearance of the map and configure which map overlays should be enabled.
Draws all labels on the map (street names, city names, …) with larger or smaller text size. Normal is the default value.
Draws all streets on the map with wider or narrower lines. The default is Normal and compared to other maps we tend to display streets narrower.
Allows you to display more or less map features on the map. The default value is High and shows hiking tracks even on low map magnifications. When you have a slower device or are in an area with a lot of streets you can set it to Low. The default is High.
Darker provides more contrast and is the default value. Lighter is a more traditional shading common on paper maps. The default is Darker.
Additionally, to the terrain shading, you can enable/disable contour lines to better judge the altitude or steepness of the terrain. The prominent lines are also labeled. The default is Contour Lines On.
Main roads and highways can be displayed in Color or Black & White. The default is Color.
This setting allows you to choose the desired map orientation when you set the location button to “heading and tracking” / . Also see Location above.
Two modes are available:
The default value is Compass.
Allows to rotate your device while in map view, and a full-screen map is displayed, without any distracting toolbar. To display the toolbar again, rotate your device again in portrait orientation. This can be useful if you want to enjoy the map on the whole screen or while in 3D-View. But it can be disturbing if you frequently take out your device from your pocket and often rotate it by mistake — so we made a setting for it.
The default is Allow Landscape Mode: Off.
On the toolbar we usually show a scale indicator . Here you can choose whether this scale is displayed all the time or if it should be hidden automatically after some time.
The default is Scale Always Visible: Off.
Map data can be large - depending on the area you download. It might be best to download all required data already at home. You can switch between Wi-Fi only and Wi-Fi & Cellular.
With Wi-Fi & Cellular map data may be downloaded using your cellular network. Depending on your phone contract this can be costly, especially if you enable data roaming abroad.
Even when you enabled Wi-Fi & Cellular we will display a warning when you are about to download a large amount of data - but nevertheless, it is your responsibility.
The default is Wi-Fi & Cellular.
To quickly bring all map data to the newest available version, you can tap on Update All Map Data. We usually update worldwide map data on a weekly basis.
To quickly reclaim storage space, you can delete all on-device map data by tapping on Delete All Map Data.
Please refer to Download Map Data on how to download your required map data.
Normally tour previews in the tour organizer are shown in Black & White and the tour in red. This gives the best contrast. If you like to display the previews in the same color as on the map, switch to Color.
The default is Black & White.
Specifies the sorting method for the tour list. Three options are available:
The default is By Import Date.
Specifies the format for sharing/exporting tours. Two options are available:
The default is GPX.
Creates a backup of all your tours. All tours are exported in GPX format, including your folder structure and a ZIP is generated. You can then share this ZIP file with the standard Apple sharing sheet. So you can e.g. save it in your iCloud file system, send it via email or transfer it to your computer via AirDrop.
The name you enter here will be used as the “author” field in recorded or drawn tours. So if you export those tours the author field will be assigned to this value.
Default is your device name (e.g. Michael’s iPhone).
Filters redundant GPS track points. To record raw GPS data, turn the setting off. Please be aware that the GPS hardware in your device usually reports one GPS location every second. So in raw mode, this can accumulate a lot of recorded track points.
The default is Optimize Recordings: On.
Dims the screen and puts the device to sleep during inactivity. You can turn this off if you e.g. use MapOut in your car and have it plugged-in to power.
The default is Display Power Savings: On.
On the map dashboard, the altitude is displayed. This setting allows you to control how the altitude should be calculated from. There are three settings:
The default is Map Data.
Allows you to choose the units for displaying distances and altitudes: Kilometer / Meter or Miles / Feet.
The default is set according to your device language and locale.
Allows you to choose the format for displaying waypoint coordinates:
There are some less important settings and information in the Feedback and Info sections.
You can send us an email with feedback right inside the app. This will add your current map location to your email if you want to report map related issues (you can delete this if you don’t want us to see this information). As we are only two developers, sometimes it might take a while to respond to all of our emails, but we try our best!
As any app developer, we also like App Store reviews, as this helps us increase our reach and keeps us motivated to work on MapOut.
In the event that MapOut crashes, the app can send additional anonymous information to help us improve our software. You can toggle this setting to off if you don’t want to send any information in Privacy ![]() Send Crash Reports. Generally, we always like feedback if you experience something strange. Some issues are location dependent and sometimes only happen if you zoom to a certain region and are otherwise hard to spot for us.
Send Crash Reports. Generally, we always like feedback if you experience something strange. Some issues are location dependent and sometimes only happen if you zoom to a certain region and are otherwise hard to spot for us.
In the About us section we have a short description about Stefan Frey and Michael Kussmaul, the two MapOut developers.
And finally, in our License section we list all used 3rd party software libraries and data we use in our app.
Terrain map with shaded relief. So steepness information can easily be recognized.↩
To start recording the GPS accuracy has to be better than 50 m / 160 ft.↩
Sometimes also known as tracks or GPX-tracks.↩
Technically we use gpsbabel from https://www.gpsbabel.org on our servers, so any format supported by it can be imported. E.g. GPX, KML, KMZ, …↩
See http://tour.mapout.me/3FUkjR+lRE+TGPLyufeOBw as an example of such a “mini-page”.↩